House Painting Tips
Easy Guide: Clean Latex Paint
Easy Guide: How to Clean Latex Paint Off a Paintbrush
Latex paint, known for its easy application and quick drying times, has become a favorite among DIY enthusiasts and professionals alike. But let’s talk about the aftermath—specifically, cleaning those brushes soaked in latex paint. This might seem daunting at first, but with the right techniques, it becomes a breeze.
In this guide, we’ll walk you through everything from understanding latex paint’s unique properties to mastering advanced cleaning methods for stubborn residue. You’ll get practical tips on maintaining your brushes to extend their lifespan and discover eco-friendly alternatives that are kinder to our planet.
So if you’ve ever found yourself struggling with hardened bristles or just looking to refine your cleanup routine after a painting project, stay tuned. We’re diving deep into making brush maintenance less of a chore and more of an art form itself.
Table Of Contents:
- Overview of Latex Paint and Its Composition
- Pre-Cleaning Steps for Latex Paint Removal
- The Essentials of Cleaning Latex Paint from Brushes
- Advanced Cleaning Techniques for Stubborn Paint Residue
- Maintenance Tips to Extend the Life of Your Paintbrushes
- Eco-Friendly Alternatives for Cleaning Latex Paint Off Brushes
- Troubleshooting Common Issues in Paintbrush Cleaning
- The Importance of Timely Cleaning
- FAQs in Relation to How to Clean Latex Paint Off a Paintbrush
Overview of Latex Paint and Its Composition
Latex paint, a staple in both DIY projects and professional painting jobs, owes its popularity to its water-based formula. This key characteristic makes it distinct from oil-based paints, providing several user-friendly advantages such as easy clean-up with water and quick drying times. But what exactly goes into latex paint that gives it these properties?
The Base: Water vs. Solvent
The primary difference between latex and oil-based paints lies in their base; latex uses water while oil paints use a solvent. This fundamental distinction means that when you’re working with latex paint, you’re dealing with a less toxic product, which emits fewer odors, and is easier on the environment.
A closer look at Environmental Protection Agency guidelines reveals why choosing water-based paints like latex can contribute positively towards indoor air quality and reduce hazardous waste.
The Binders: Acrylics Lead the Way
In addition to water as the carrier liquid, binders are used in paint formulations to help pigments adhere to surfaces. In the case of latex paints, synthetic polymers such as acrylic or vinyl-acrylic combinations serve this purpose well—they provide flexibility and durability to painted surfaces.
This aspect explains why certain high-quality exterior-grade latex paints can withstand weathering better than many oil-based alternatives. Their binder composition allows for an expansion-and-contraction capability unmatched by traditional oils which crack under pressure—literally.
Pigments & Additives: Colorful Chemistry at Work
Last but not least are pigments—the components responsible for color—and various additives designed to enhance specific characteristics like mildew resistance or flow improvement during application. The blend of these ingredients ensures that not only does your chosen shade pop visually but also performs reliably over time against elements or wear-and-tear inside homes.
Pre-Cleaning Steps for Latex Paint Removal
Before diving into the cleaning process, there are preliminary actions that can significantly ease the task. This part will cover removing excess paint and preparing the brush for a thorough cleaning.
Wipe Away Excess Paint
The first step is all about minimizing waste. Use a paper towel or an old rag to gently wipe away as much paint from your brush as possible. Think of it as giving your brush a quick pre-rinse before the actual cleaning begins. This simple act can save you so much hassle later on.
If you’re dealing with a particularly stubborn load of paint, consider using a paint comb. This tool not only helps in removing excess but also separates bristles, making them easier to clean thoroughly afterwards.
Swirl and Soak
Next up, let’s talk soaking. Fill a container with warm water and swirl your brush around in it for about 10 minutes if the paint hasn’t dried yet; this loosens up any remaining latex particles clinging onto those bristles.
This process might remind you of steeping tea—the longer it sits (within reason), the better the result will be when it comes time to rinse everything out completely.
Rinsing Phase
Last but certainly not least: rinsing under running water should always follow these initial steps; think gentle rainfall rather than hurricane-force winds here. Adjust tap pressure accordingly because too strong could damage your brushes over time while too weak won’t get rid of all residues effectively either. The goal? Rinse until water runs clear indicating no more latex remains hidden within its fibers.
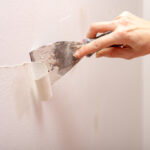
The Essentials of Cleaning Latex Paint from Brushes
When it comes to cleaning those brushes, things can get tricky if you don’t act fast. Fear not; with the right approach, your brushes will be as good as new.
Step 1: Wipe Away Excess Paint
First things first—don’t let that paint dry. Gently wipe off any excess latex paint onto a piece of newspaper or a rag. This step reduces the amount of paint you’ll need to wash out later and saves water too.
If there’s still quite a bit left on the brush, consider swishing it in a cup of warm water to loosen up more of that stubborn latex paint before moving on.
Step 2: Rinse Under Warm Water
Rinse your brush under running warm water. A little elbow grease goes a long way here; use your fingers to massage the bristles gently. This helps remove most of the remaining latex paint without being too harsh on your precious tools.
Sometimes just plain old tap water does wonders for wet latex paint removal.
Step 3: Soak If Necessary
If some pesky bits refuse to budge after rinsing thoroughly, soaking might be necessary. Fill up part of your sink or container with warm soapy water (mild dish soap works great) and allow your brush(es) to soak for about five minutes. Then go back in with finger techniques mentioned earlier, and voila. The remainder should come right off.
Remember though: patience is key during this process. Avoid using wire brushes or overly abrasive materials that could damage the bristles.
Step 4: Final Rinse & Dry
Once all that latex paint is gone, give it one right final rinse in warm water. This ensures no soap residue remains which could affect future paint applications. Dry your brushes by gently squeezing out any excess water with a clean rag or paper towel, and then lay them flat on a dry surface or tilt slightly to the side for efficient air drying. Never stand brushes their head up as moisture can run into the ferrule (causing rust or damage). Following these steps can greatly extend the lifespan and your brush performance for projects to come.
Advanced Cleaning Techniques for Stubborn Paint Residue
When latex paint dries on your brushes, it’s like trying to get gum out of your hair—frustrating but not impossible. Here are some tried-and-true methods to tackle those stubborn spots without ruining your bristles.
Vinegar Heat Therapy
Sometimes, warm soapy water just doesn’t cut it. For these occasions, vinegar can be a paintbrush’s best friend. First, pour enough white vinegar into a pot to cover the bristles and heat it until it simmers—don’t let it boil as that could harm the brush fibers. Soak the brush in this hot bath for up to an hour before washing with soap and water.
This method works wonders because vinegar’s acidic nature helps break down the latex paint structure. It’s also eco-friendly and uses items you likely already have at home.
Fabric Softener Rescue Operation
If you thought fabric softener was just for clothes, think again. Mixing one part liquid fabric softener with four parts water creates a solution that can soften even hardened paint. After soaking your brush in this mixture for about 10 minutes, rinse under warm water while gently working out the softened paint from between the bristles.
This technique is especially useful because, besides cleaning, it conditions your brushes leaving them softer and extending their lifespan—a win-win.
The Alcohol Solution
Last but certainly not least: rubbing alcohol or isopropyl alcohol can act as a solvent on dried latex paints without damaging synthetic fibers used in most modern brushes. Simply soak your stiffened brush in alcohol for about 30 minutes then gently comb through any remaining residue using a fine-toothed metal comb or wire brush.
Rubbing alcohol has proven effective due to its ability both dissolve certain components of dried latex paint yet evaporate quickly enough not to leave behind harmful residues once finished. Remember though, always work in well-ventilated areas when handling solvents such as these.
Maintenance Tips to Extend the Life of Your Paintbrushes
Paintbrushes are like the unsung heroes of every masterpiece, whether it’s transforming a room or crafting a canvas. But after their hard work, they deserve more than just being tossed aside. Here’s how you can keep them in tip-top shape for years.
Dry Them Like You Mean It
After cleaning your brushes, drying them properly is crucial. Lay them flat on a towel to avoid water seeping into the ferrule, which can loosen bristles and lead to shedding during your next painting session. For those who’ve seen too many good brushes go bad from improper drying techniques, trust me when I say this small step makes all the difference.
If you’re feeling fancy and want to ensure they dry with their best foot forward, hang them bristle down using a brush holder or even some makeshift string setup. This way gravity does its job without compromising the brush’s shape.
Storage: The Final Frontier
The right storage solution is not rocket science but think of it as putting your paintbrushes into hibernation between projects. Avoid cramming them into a dusty old cup where they get bent out of shape – literally. Instead, opt for horizontal storage in protective cases or artist’s toolboxes that give each brush its own space.
Bonus points if you wrap larger brushes in breathable cloth before storing; it keeps dust away while letting air circulate the bristles so mold doesn’t stand a chance.
This may sound like Brush Care 101 but considering how much professionals invest in high-quality tools, these steps are worth their weight in gold (or at least paint).
Eco-Friendly Alternatives for Cleaning Latex Paint Off Brushes
After a long day of painting, the last thing you want is to spend hours cleaning your brushes. But before you reach for harsh chemicals, consider some eco-friendly alternatives that are kinder to both your brushes and the planet.
Vinegar: The Unsung Hero in Your Pantry
If you thought vinegar was just for salads, think again. This pantry staple can work wonders on latex paint-covered brushes. Simply soak them in hot vinegar for around 30 minutes, then wash them with warm soapy water. Not only does it loosen up the paint, but it also conditions the bristles, leaving them soft and pliable.
This method has been tried and tested by countless DIY enthusiasts and professionals alike. It’s a testament to how sometimes simple solutions are hiding right under our noses—or in this case, our kitchen cabinets.
Baby Oil: More Than Just For Babies
Baby oil might seem like an unlikely candidate for cleaning paintbrushes but hear us out. Applying a small amount of baby oil after removing most of the latex paint helps prevent the remaining residues from hardening on the bristles. After working in the oil with your fingers or a comb gently rinse off any excess with soap and water.
The beauty of using baby oil lies not just in its effectiveness but also in its safety profile; it’s gentle on both hands and brush fibers—a win-win situation if we ever saw one.
Citrus-Based Cleaners: Nature’s Degreaser
Last but not least let’s talk about citrus-based cleaners which have natural degreasing properties making them excellent at breaking down latex paints without harming brush hairs or ferrules when used correctly follow instructions carefully as these products vary widely. Plus they leave behind a pleasant scent much better than traditional solvents could ever hope to achieve.
Troubleshooting Common Issues in Paintbrush Cleaning
Ever found yourself staring down a paintbrush caked with dried latex paint, feeling like you’re trying to solve a Rubik’s cube blindfolded? You’re not alone. Here are some tricks of the trade to tackle those head-scratchers.
Paint Won’t Budge?
If your brush has turned into a petrified forest of bristles, soaking might just be your new best friend. But here’s the twist: warm water works wonders but for an extra kick, add a dash of fabric softener. The combination is like sending your brushes to a spa; it loosens up even the most stubborn paint without turning it into mush.
Remember though, patience is key. Give it time — at least an hour or two — before attempting any further cleaning steps.
The Bristles Have Lost Their Shape
Facing a brush that looks more like it’s been through a wind tunnel than used for painting? It’s all about giving those bristles back their mojo. After cleaning out all the paint residue, wrap the damp bristles in paper and secure them with tape or rubber bands while they dry. This little hug keeps everything tight and right until the next use.
This method helps maintain shape and ensures longevity, so you’re not stuck buying new brushes every other project.
Lingering Odor Woes
Sometimes brushes can smell funkier than last week’s forgotten gym bag—especially when dealing with potent materials beyond simple latex paints. A quick dip in vinegar followed by thorough rinsing can neutralize odors leaving your brushes ready for action without making your workspace smell like salad dressing.
The Importance of Timely Cleaning
Picture this: you’ve just wrapped up a day’s worth of painting, and your brushes are coated in latex paint. You think, “I’ll clean these later,” but as time ticks by, the paint hardens like cement. That’s because latex paint is water-based and dries quickly when exposed to air.
To prevent this sticky situation, it’s crucial to clean your brushes immediately after use. Why? Because dried latex can turn what was once a smooth brush into something that resembles a porcupine more than a painting tool. Not only does this make the brush practically useless for future projects, but it also wastes money since you’ll need to buy new ones.
Why Quick Action Matters
Cleaning your brushes right away keeps them soft and pliable, ensuring they’re ready for your next creative endeavor. This practice not only preserves the quality of your tools but also saves you from unnecessary spending on replacements.
Additionally, timely cleaning helps maintain the integrity of bristles and prevents them from becoming frayed or distorted – common issues that arise from leaving paint to dry on brushes.
In essence, taking care of your tools means they take care of you during each artistic journey. So next time you’re done painting with latex paints, check out some quick tips on proper brush cleaning. Your wallet—and future masterpieces—will thank you.
FAQs in Relation to How to Clean Latex Paint Off a Paintbrush
How do you get latex paint out of a paintbrush?
Rinse the brush under warm water, working out the paint with your fingers. For tougher spots, dish soap helps break it down.
What is the best solvent for latex paint on a brush?
Warm water and mild dish soap are your go-tos. They’re effective yet gentle on brushes.
How do you remove dried latex paint?
Soak the bristles in hot vinegar for an hour, then scrub gently with a brush comb or old toothbrush.
What is the best soap to clean latex paint brushes?
Mild liquid dish soap cuts through latex paint without harming brush fibers. It’s both effective and accessible.
Cleaning latex paint off a paintbrush isn’t just about keeping your tools ready; it’s an art. You learned that water-based formulas are friendlier but still need care. Warm, soapy water works wonders, yet for tough spots, dipping in vinegar or fabric softener does the trick.
Remember: Timely cleaning saves brushes. Advanced techniques rescue even the most neglected ones. Eco-friendly options protect our planet while ensuring clean bristles.
Maintenance is key. Regular care extends brush life significantly.
So take these lessons to heart. Let them guide your post-painting cleanup routine and watch as maintaining those brushes becomes second nature—just like creating with them.
Stellar Painting offers a practical, easy-to-follow guide that can prolong the lifespan of your paintbrushes. Stay tuned to our blog for more expert advice and tips on maintaining your painting tools and ensuring their longevity.
Want to know where your site actually stands?
Run the free check. It takes about a minute and tells you what search engines and AI answer engines can and cannot read on your site.
See what we'd fix →